
An Acoustic Simulator for Headphone Amplifiers
by Chu Moy
This article describes modifications to a headphone processor circuit that appeared in an Audio magazine article called "Improved Headphone Listening" by Siegfried Linkwitz (Audio, December 1971). The processor is a simple RC filter that creates a more realistic sound image in headphones by electronically mimicking the "shaded" interchannel crossfeed of spatial hearing. It is based on a circuit published by Benjamin Bauer ten years earlier, but the Linkwitz version does not use inductors and is less sensitive to load impedance. (Crossfeed processors should not be confused with their bigger siblings: virtualizers that use digital signal processing to simulate binaural or externalized 3D sound.) These modifications improve the sound of Linkwitz processor and optimize the circuit to work with headphone amplifiers.
I tested the modifications with a tube-based Musical Fidelity X-Cans headphone amplifier and Sennheiser 465 headphones. The source was a Panasonic SL-SX500 CD player. The processor can be placed either before or after the headphone amplifier. Most of the testing was done with the processor driving headphones directly, but putting the processor before the amplifier will eliminate any impedance interaction between the processor and headphones. When driving headphones directly, the processor will probably work best with solid state headphone amplifiers at the input, as these have a very low output impedance and high current capability. The Sennheiser 465s have a 60 ohm impedance and 94dB sensitivity. The processor favors headphones with higher impedance and efficiency.
For a superior 3D effect with supra-aural headphones, wear the earcups to enhance in-front imaging (slightly down and forward on the ears). This positioning helps direct the sound waves to enter the ears at an angle as happens with normal hearing, instead of going straight to the eardrums. The technique does not work as well with circumaural headphones. For more information about the original Linkwitz circuit, please refer to the Audio magazine article cited above. For more information about the Bauer circuit and acoustic simulators generally, see Technologies For Presentation of Surround Sound in Headphones and The Psychoacoustics of Headphone Listening. For information on commercial crossfeed processors, see A Quick Guide to Headphone Accessories.
Background
At work, I listen to music with headphones several hours each day. My system is a Musical Fidelity X-Cans amplifier and a pair of Sennheiser HD465 headphones (discounted 50% from a liquidation house!). The source material is either CD or FM radio. Although the audio reproduction is excellent, I cannot listen to this system for more than four hours without suffering headaches, caused by the super-stereo effect that is characteristic of headphone listening.
Stereo recordings are meant to be heard through loudspeakers. Headphones create a soundfield that is unnaturally spacious, in which some sounds seem to be crowded around each ear. A few months ago, I did some research into the problem. Headphone amplifiers from HeadRoom Corporation had a built-in crossfeed circuit to mitigate this unpleasant effect. However, I did not want to replace the X-Cans amplifier. Then I ran across a stereo crossfeed circuit in an old issue of Audio Magazine, which seemed to do something very similar to HeadRoom's processor.
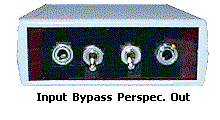
I upgraded the design with higher quality parts, which I ordered from Digi-key Electronics and Mouser Electronics. The circuit was assembled on a 2" x 1.75" piece of printed circuit protoboard and put in a PacTec case from Radio Shack (RS 270-211). The front panel had two mini-stereo jacks (for the input and output), and a bypass toggle switch. (See A Pocket Headphone Amplifier for more information about purchasing parts.) The output of the X-Cans went to the input of the processor, and the headphones plugged into the output. After a month of listening with the Linkwitz circuit, I became dissatisfied with the sound quality. It did eliminate the super-stereo effect, but introduced other sonic problems.
First, the high frequencies were severely attenuated compared to the original signal, despite the built-in treble boost in each channel. The imbalance imparted a muffled effect to all kinds of music. With some vocalists (such as Barbra Streisand - yes, I am a fan), voices took on a "thick" quality. I suspected that the effect was caused by phase anomalies at the crossover point interacting with phasey artifacts in recordings.
Second, the level of crossfeed was a bit excessive for my tastes. The soundstage was pulled inward, away from the ears, but I felt as though I was sitting in the back of an auditorium with heavily padded walls. Flipping the bypass switch restored the spaciousness and reverb at the expense of the benefits of the crossfeed.
Third, the processor was power hungry. The original circuit was designed to be connected to the output of a power amplifier. Running it from the speaker outputs of a 15W receiver produced ample volume. The X-Cans, on the other hand, huffed and puffed along at a relatively measly 100mW maximum output. A few Thevenin computations also revealed that the output impedance of the processor was slightly frequency dependent and varied from 61 to 73 ohms. My Sennheiser HD465s were rated at 60 ohms. These factors explained why I had to keep the X-Cans volume control at 75% rotation to achieve acceptable listening levels.
The Modifications

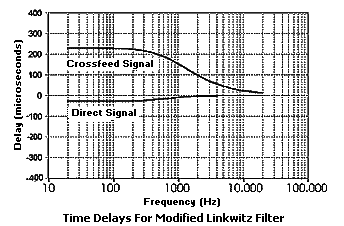
The original circuit (figure 1) crossfed frequencies below 700 Hz (figure 1a). Linkwitz noted that the low frequency blending raised the bass response in each channel by about 3dB. He designed a 2dB treble boost to compensate partially for the increase, reasoning that full compensation was not needed because the low frequencies in each channel weren't always in phase. On some recordings, the processor appeared to reduce the amount of deep bass due to phase cancellation. However, it also overemphasized the lower midrange and imparted a heaviness to the sound. Even though the separation between channels increased above 700 Hz, there was some high frequency attenuation - probably due both to phase effects at the crossover point and the fluctuating output impedance.

Figure 1a
The most obvious solution was to increase the treble boost, but that would not have affected the circuit's high drive requirements or the apparent width of the soundfield. A voltage divider at the input (R1/R2) set the original attenuation factor at about 1:6. The crossfeed signal was summed into the output resistor (R2) of the divider. Increasing the value of the output resistor would increase the voltage output, but would also increase the output impedance and vary the level of crossfeed. Not a good idea. Any alterations to the treble boost or crossfeed sections could also affect the time delay characteristic of the system.

Lowering the input resistor (R1) would increase the output voltage, while keeping the crossfeed level constant (but having the effect of reducing percent of crossfeed in each channel, because a smaller R1 increases the level of the main signal). If crossfeed level remained constant, decreasing the value of R1 would "widen" the soundstage and create a smoother response with the existing treble boost. Also, a smaller R1 value would minimize output impedance fluctutation. After experimenting with several R1 values, I set R1a to 200 ohms (40% of the original value) (see figure 2).
How It Sounds
The improvement in the processor's sound through the Sennheiser 465s was remarkable. The highs were back. The bass was stronger and better defined. Instruments and vocals were focused and had "air" around them again (Barbra's voice sparkled). Although the soundstage was wider, the crossblend was still effective. For example, reverb didn't "bounce" off my ears the way that unprocessed headphone reverb does, and the bass was more centered like loudspeaker bass. Recordings that polarized the stereo presentation with instruments or vocals to the extreme left and right had an improved sense of aural continuity. There was just a trace of the emphasis in the lower midrange which actually made for a very natural presentation. I also had a chance to audition the processor with a pair of Sony MDR-V600 phones. The MDR-V600s have a bass-rich sound, which the crossfeed processing highlighted.

A comparison of the original to modified signal levels (figure 3) shows that the modified output is about 3dB louder in each channel because of the new attenuation factor of 1:3. The low frequency separation is 6 dB, 3 dB wider than before. The overall output impedance is lower and is flatter over the audio range: 51 to 60 ohms. The X-Cans can now comfortably drive the processor with the volume control at around 30% rotation. The modified output sounds much more open and clearer than the original. My calculations indicate that the high and low frequencies are 25% closer in level than the original. The improvement in sound is so great that I suspect the reduction of high frequency phase effects due to the wider separation also contributes significantly. The modification increases the crossfeed threshold frequency by about 8%.
Since all recordings are not the same, I added a "PERSPECTIVE" switch (S1) to customize the processing with an alternate R1 value. At R1b = 150 ohms, the low frequency separation between channels goes up to about 10dB and the overall output increases by about 2dB. Toggling from R1b to R1a, the soundstage appears to move further away (lower output, more narrow soundstage, slightly softened highs). After a period of listening, I have settled on the R1b setting as the default, and use R1a when the sonic presentation would otherwise be too wide. The PERSPECTIVE switch has a small (but distinct) effect with these R1 values. In my view, it is best used as a fine adjustment.
Many DIYers like the sound of the simulator with the parts values shown, but others have written to tell me about their modifications to the circuit. I encourage anyone interested in building this simulator to experiment with parts values to get the best sound for that person's hearing preferences and characteristics. The easiest way to customize the simulator is to build it first on an experimenter's breadboard and then permanently solder the connections after the best sound is achieved.
The most popular modification is to decrease or increase the values of R1a/R1b in the range from 50 ohms to 330 ohms. Again, the lower the value of R1, the wider the soundstage will be. Another popular modification is to decrease C2 to 1uF, which can give a bit more depth to the soundstage due to the higher threshold frequency. The crossfeed threshold frequency is given by: Fcrossfeed = 1/[2*pi*C2*[R4 || (R5 + {R2 || R1})]]. The treble boost threshold frequency is approximately 1/[2*pi*C1*R3]. The amount of treble boost can be increased/decreased by decreasing/increasing R3 (to keep the threshold frequency constant, choose C1 so that R3*C1 = 0.00022). If the simulator will ONLY be used as an input stage to a headphone amplifier, consider scaling the resistor and capacitor values (x10 resistors and ÷10 capacitors) to get a larger input impedance (about 2000 ohms). Do NOT scale the parts if the simulator will ever drive headphones directly.
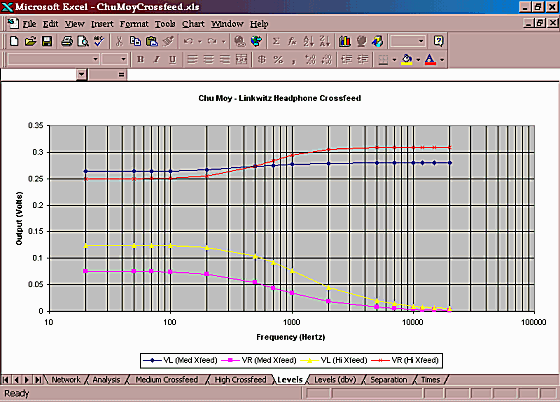
Download Gus Wanner's Excel Application
For DIYers who want to customize the simulator but don't have the time or patience to build many versions, Gus Wanner has prepared the above Microsoft Excel 2000 application, which can instantly plot changes in frequency response, time delays and other circuit characteristics as component values change. To use this spreadsheet, Excel must have installed the engineering functions in the analysis toolpak (which comes with the Excel package but is NOT automatically installed by the standard MS Excel install program). To install this toolpak, use the add-ins submenu of Excel. Verify that the correct toolpak is installed by clicking on Insert|Functions options and look for the engineering functions menu. Excel 97 should work the same way.
Mr. Wanner describes the application as follows:
The analysis is straight-forward, using Thevenin equivalent impedances and voltage sources as explained on the "analysis" tab. Note that Excel does NOT have any formatting capability for complex numbers (they display with maximum precision all the time, taking a huge amount of space). I have "cut them off" (for display only) by putting blanks or other values into adjacent columns.
The spreadsheet is parameterized for a medium and high crossfeed case designed for use with a low power amplifier (20 watts/ch or so) and a load of 70 ohms (the Sennheiser HD-25 impedance). The network sheets are protected (to prevent my accidentally wiping out formulas and values); there is no password, so simply unprotect the sheets (Tools|Unprotect) to change the values.
See the addendum for more details about this application.
As a finishing touch (and I know this will sound like heresy to audiophiles), try a little equalization, such as the biphonic EQ suggested by Ron Cole and John Sunier (for more information about the biophonic EQ, see Taking Audio in Another Direction). The crossfeed processing compensates for some of the missing HRTFs in headphone listening, but equalization can help headphones sound even more natural. For more information about equalizers, see A Quick Guide to Headphone Accessories and Designing a 3-Band Pocket Equalizer for Headphones.
Comparison With HeadRoom Circuit
I have never heard a HeadRoom amplifier, so I cannot compare sound quality. Based on the information available in their article The Psychoacoustics of Headphone Listening, HeadRoom's circuit probably uses a Bessel low-pass active filter for the crossfeed, which has constant group delay, whereas the Linkwitz uses simpler RC filters. Reports from HeadRoom owners and HeadRoom's own description of the effect of its crossfeed circuit suggest that the resultant soundfields are similar, if not the same. Neither circuit is a true auralization processor, but does impart greater realism to headphone soundfields.
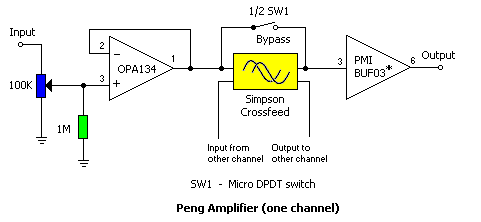
As an active design, HeadRoom amps have very low output impedance. The Linkwitz processor can be placed before the headphone amplifier to avoid impedance interaction with headphones (the audio source will see an input impedance of about 200 ohms). Another option is to buffer the processor's output to isolate the processor from the headphones. In figure 4, the Burr-Brown BUF634 is a high-speed, high current buffer with an output impedance low enough to drive any pair of headphones - and it will run off a battery supply (see Designing an Opamp Headphone Amplifier for more information on battery power supplies).
One other difference is that HeadRoom amplifiers do not have a Perspective adjustment. They do have a filter switch to turn off the treble boost. In the Linkwitz circuit, the treble boost can be turned off shorting out C1. I want to stress that HeadRoom has put alot of R&D into their processing circuit. Their design choices may have many sonic advantages. One day, I hope to hear a HeadRoom unit.
Finally, the price for the modified Linkwitz circuit is hard to beat, especially if one already has a headphone amplifier. The upgraded parts, case, switches and jacks came to about $20. A headphone amplifier with the modified Linkwitz circuit could be built for less than $40.
A Note About Damping Factors and Headphones
Because the Linkwitz processor has a high output impedance, the damping factor will be low for all headphones except those with high impedances. For a power amplifier, a high damping factor has been viewed as an indication that the amplifier can drive speakers with excellent bass definition. However, that view has come under fire as being more a "marketing ploy" than a real factor in amplifier performance, especially where equipment makers claim damping factors in the thousands as being advantageous for sonic accuracy.
Headphones are not the same as loudspeakers, and tend to have flatter impedance curves. So long as headphone impedance remains flat over the audible range or never falls below a threshold (say 10 times the processor's output impedance), the headphone amplifier's current output is the dominant factor in sound quality. Where headphone impedance falls below that threshold in the audible range, the Linkwitz circuit may introduce some coloration due to impedance fluctuation.

One test to see if a pair of headphones is affected by the processor's output impedance is to compare the bypassed output of the processor with the volume-matched direct output of the headphone amplifier. If the quality of the bypassed sound is unacceptable, then the processor cannot drive the headphones directly. Again, one can either buffer the output (see figure 4) or put the processor before the headphone amplifier. The HeadWize FAQs has more information on the effect of damping factor on headphone performance.
Conclusion
The modified Linkwitz circuit sounds natural and spacious with an even frequency response. The processor's effect is more subtle compared with the original design, and is, therefore, less intrusive into the musical experience. On many recordings, it adds an almost three-dimensional quality to the presentation. Headphone listening is now definitely less fatiguing. I can listen to my headphone system for hours every day without headaches. If I do feel the need to take them off, it is usually because my ears hurt from having the headphones physically pressed against them for a long time.
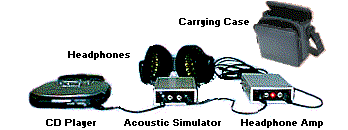
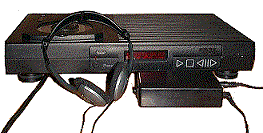
The processor in the recommended enclosure also pairs well with my pocket headphone amplifier (shown above) for a very good portable listening system. Both units are lightweight and will fit into many portable stereo carrying cases. The unused battery compartment in the acoustic simulator is good for storage of small accessories such as a headphone plug adapter. If you build the Linkwitz circuit with or without my modifications or have other mods you'd like to share, please don't hesitate to e-mail me.
Thanks to Tyll Hertsens for his helpful comments.
Addendum
8/15/98: For better in-front localization with the Linkwitz processor, try wearing the headphones slightly forward and lower on the ears (supra-aural phones are the easiest to position this way). Experiment with the positioning to obtain the best localization. The goal is to get the sound to enter the ears at an angle, which is closer to the way normal hearing works. With the right recordings, this technique can produce a stunning sense of depth. It also works without crossfeed, but does not sound as natural.
10/6/98: Updated comparison of HeadRoom circuit to Linkwitz circuit. I also want to report that depending on the recording, the R1a setting of the perspective switch ("further from the soundstage") can render a more 3D sound image, although the apparent width of the presentation would be fine without the additional crossfeed.
10/25/98: Added discussion about placing processor in front of headphone amp to eliminate any impedance interaction between the processor and headphones. Also clarified a few points throughout article.
11/16/98: Added image and description of portable headphone system. Also received report from user that the processor can drive Grado headphones directly with good results.
6/22/99: Added graph of time delays for the modified Linkwitz filter.
8/20/99: Mika Vääräniemi built the acoustic simulator and pocket amp in a single aluminum enclosure. He experimented with various values of C1 and R1 and found that C1 = 1uF and R1a = 50 ohms, R1b = 100 ohms had the widest soundstage and least effect on the high frequencies. "[B]efore I was positioned in the middle of band playing music. Now I'm in the front row as close as you can be.... Music just sounds realistic and that's what I was looking for." A more complete description of his work can be found in the DIY Workshop Forum.
8/26/99: Here is the parts layout and wiring diagram for Mika Vääräniemi's simulator/amplifier project. Pictures of the finished amplifier can be see in A Pocket Headphone Amplifier.

11/23/99: Added more guidelines for customizing the simulator.
12/9/99: Siegfried Linkwitz (himself!) e-mailed me the equation for calculating the crossfeed threshold frequency, which I have added to the article. Check out his new website: Linkwitz Lab.
1/12/00: scrazy@gcn.net.tw built this version of the pocket amp, which has a 10K ohm volume control and an acoustic simulator front-end that is based on the circuit by Chester Simpson (see design by Fred Peng below). Full details can be found at DIY Zone (in chinese only). His system consists of a Rega Planet CD Player and Audio Technica ATH-f15 headphones.
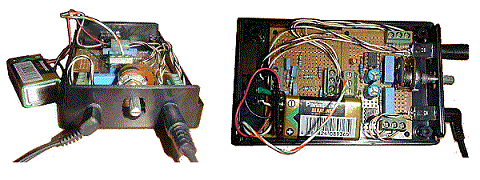
1/13/00: Fred Peng based his headphone amplifier on the acoustic simulator by Chester Simpson (which is based on the Linkwitz design), except that he replaced the R4,R6 combination in Simpson's circuit with a 100K ohm resistor and added a unity gain input buffer stage made from an OPA134 and a high current output stage made from a PMI BUF-03 buffer. When compared with a McCormack Micro Headphone Drive, the BUF-03 driving his Grado HP-1 headphones with the simulator bypassed sounded better in the high and low frequencies than the McCormack, but the McCormack was better in the mid frequencies. With the simulator switched in, the sound was more relaxed, the low frequencies more centered, and the soundfield moved from inside his head to outside. He is very satisfied with the result and is planning to make another simulator for his Stax Lambda headphones. Full details and schematics (in chinese only) can be found at DIY Zone.
1/28/00: Added figure 1a. Thanks to Siegfried Linkwitz for sending me the graph!
5/1/00: Gus Wanner has sent in a Microsoft Excel Spreadsheet application that analyzes changes to component values of the modified Linkwitz circuit (see the text above for instructions to download). He writes:
I enjoyed your article on your modification to the Linkwitz crossfeed network. Since I have a low power (20 watt/channel) high quality amplifier integral to my McIntosh C-40 audio control center, I wanted to develop a version of this network to work with the C-40 and my Sennheiser HD-25 phones (and other headphones with greater than 60 ohm impedance). The HD25s have a maximum input level of 200mW. With the HD25s at 70 ohms, this will require a voltage of approximately 3.7 volts across each channel or approximately 11.8 volts into the crossfeed network. This voltage level corresponds to an amplifier output of 17.5 watts into 8 ohms.
To aid in doing the design, I developed a complete analysis of the Linkwitz network using the complex number analysis capability built into the MS Excel spreadsheet (and I think also available in newer versions of Quattro Pro). The spreadsheet allows you to enter values for the various components, and immediately computes the resulting levels, channel separation, and delay times for frequencies from 20 - 20,000 Hertz. Graphical plots for these parameters versus frequency are included as well.
The component values on the spreadsheet are the final values for a crossfeed circuit I designed for use with my McIntosh C-40 and my Sennheiser HD-25 headphones. The circuit is relatively insensitive to load impedances 70 ohms or greater, so it would work with other headphones as well. The modified Linkwitz crossfeed filter works great with my Sennheiser HD25s.
c. 1998, 1999 Chu Moy.