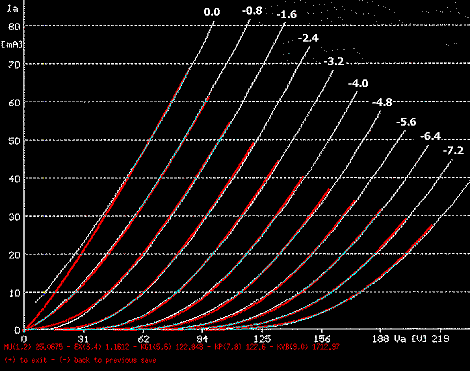
Figure 1 - E182CC SPICE Simulation
Top-Level OTL Tube Headphone Amplifier
by Andrea Ciuffoli
This article shows my tube headphone amplifier designs for driving headphones with an impedance of 200 to 600 ohms (I am using these amplifiers with the Sennheiser 580, which has a 300-ohm impedance). The problem with many tube headphone amplifiers is the high output impedance and the low output current that decrease the sonic performance. I have analyzed many schematics, from a hybrid design with an E88CC voltage gain stage and a direct-coupled IRF610 MOSFET output stage to a design involving a 6080 or 6C33C-B as output stage in a cathode follower configuration.
The hybrid with the IRF610 source follower does not have very good sound, the amp with the 6080 output stage has pretty high output impedance (more devices per channel would lower output impedance, but then the tubes must be carefully selected) and the 6C33C-B is not very linear for a headphone amp (but it is very good in
an OTL amp for driving loudspeakers).DESIGN GOALS
The design goals for my amplifiers were:
The designs have been optimized using a SPICE circuit simulator with an advanced tube model by Mithat F. Konar. This model is very close to real tube performance, and I have developed an interactive program to find the right parameters. Here are the results for the E182CC (simulation in red, actual in white):
Figure 1 - E182CC SPICE Simulation
and for the 5814 (ECC82 military type):
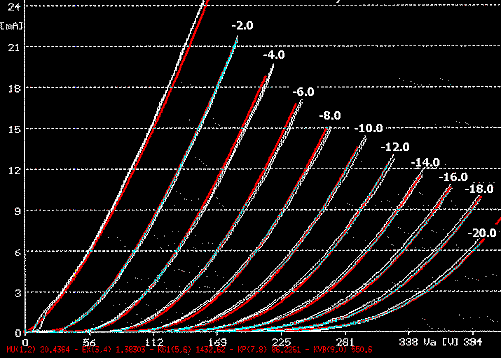
Figure 2 - 5814 SPICE Simulation
The SPICE model is so close that it is sometimes difficult to see the difference between model and real tube curves. The real tube curves were generated with Audiomatica's Sofia vacuum tube curve tracer. The SPICE circuit simulator is available for free on Unix (Berkeley) and on Windows (WinSpice), and there are many commercial ports on Windows 95/NT. [Editor: an evaluation copy of a GUI-based SPICE simulator for Windows can be ordered from OrCAD.]
THE CIRCUIT
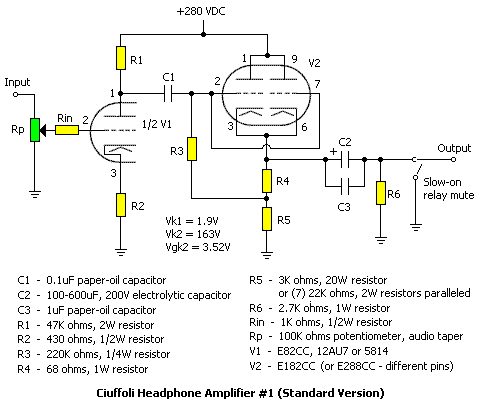
Figure 3a
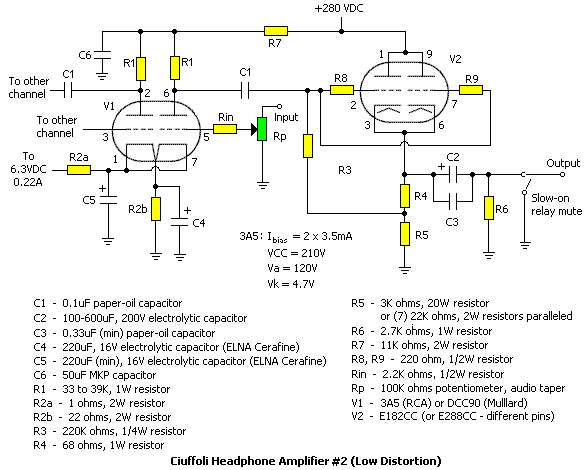
Figure 3b
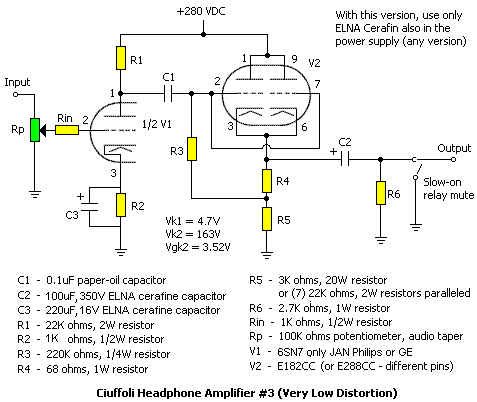
Figure 3c
The headphone amplifier circuits (figures 3a, 3b and 3c) use a single-ended triode class A gain stage and a paralleled-triode cathode follower output stage. The first version with E82CC/5814 should be considered the starting point. It has good sound but with some distortion because noval (new 9-pin tubes) tubes are not very linear. I have tested the first version with a 5814 JAN Philips. It could be that other tubes of this same type such as the E82CC/ECC82 Mullard or Jan Philips will have better sound. Each section of 5814 is biased at 4.42mA and dissipates 3.76W. To reduce the distortion of the first version with E82CC/ECC82/5814 tube, I don't have a bypass on cathode resistor to leave some local feedback, but you can try to bypass it with 220uF, 16V ELNA Cerafine electrolytic capacitor as with the other versions.
The second version with the 3A5 (I used a RCA 3A5), a direct heating tube, gives less distortion and has a very liquid sound as only direct heating tubes can do. The 3A5 MUST have a DC filament supply, such as the 6.3VDC supply shown in figure 7. The third version with the a Jan Philips 6SN7 (that I now prefer) has a less liquid sound than the 3A5, but the distortion is very low and the bass response is fantastic! Sometimes during listening sessions with the 6SN7 I thought that the high frequencies were missing, but this is not true. Note: the 3A5 is sensitive to microphonics (if you touch the table where the amplifier is, you will hear a "gong" in the headphones). I have mounted the 3A5 on a floating socket. Tube dampeners might also reduce the microphonic effect, but I have not tried them.
In all versions, the output tube V2 is biased at 26mA per section (52mA combined) for a total dissipation of 6W (2x3W). Use only Mullard or JAN Philips tubes.
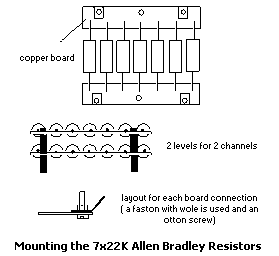
Figure 3d
All resistors should be Allen Bradley carbon types for the better sound. The 7 x 22K, 2W resistors can be replaced by one 3K ohm Caddock non-inductive type (20w) in the TO220 case. Figure 3d shows how I mounted the 7x22K resistors. The copper board templates are included in the PC board layouts below.
The inter-stage and output capacitors are the Jensen or Audio Note paper-oil types, but a MKP type (such as Solen) will also work. For the electrolytic capacitors, I prefer Black Gate or ELNA Cerafine (by Audio Note), but ROE, SPRAGUE, MALLORY are good substitutes.
In the last years, two trends have emerged about the capacitors to use in a high-end amplifier: MKP polypropylene (output stage and interstage), electrolytics (in the power supply) and paper oil (interstage). The MKPs in many tests rank at the top for low distortion, low internal resistance and maximum speed under dynamic conditions. Electrolytics have higher distortion and lower speed, but very good electrolytics are now available, such as Black Gate and ELNA Cerafine, both designed for audio.
I have not tested these new capacitors, because I am searching for a good source with a good price before I buy. At this time, I am using the ROE electrolytics and the SOLEN MKP. In listening tests, the MKP has an inclination to smooth out contrasts. So make your choice! In this design, the output capacitor of the power supply and the output capacitor of amplifier can be replaced with 220uF or higher value MKP types or other audio types. This list of capacitor sources is very useful for finding the right shop:
THL Audio
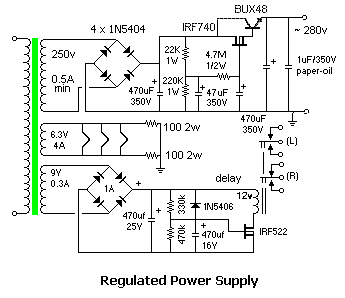
Figure 4
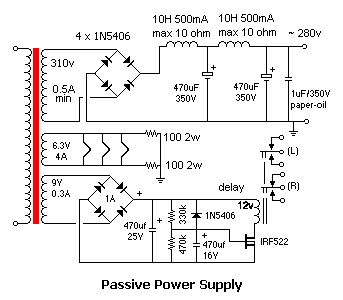
Figure 5
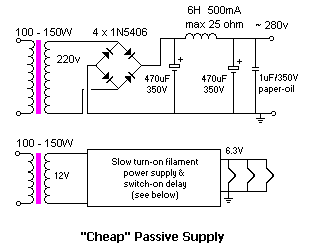
Figure 6
About the power supply, the filaments can be powered by AC or DC except that the 3A5 (version 2 of the amplifier) requires a DC filament supply. Each supply has a timed relay that mutes the audio output until the tubes stabilize. I have designed 3 different power supplies - regulated, passive and cheap passive:
The audio output relay prevents turn-on thumps and allows the tubes to stabilize by muting the amplifier output for about 150 seconds or 2.5 minutes (RC = 330K * 470uF) after startup. The relay is a 12VDC DPDT (7-10A max. load) with a coil resistance of about 150 ohms. See the amplifier schematics (figures 3a and 3b) for details about wiring the relay connections.
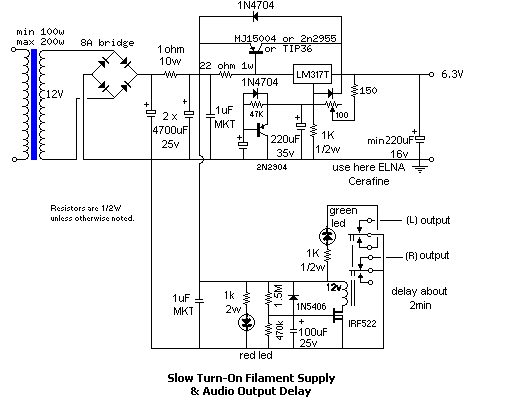
Figure 7
This amplifier runs quietly without a DC filament power supply, but for a more stable filament voltage, I suggest the slow turn-on supply (figure 7) to replace the filament supplies in figures 4 and 5 (the cheap passive supply already has the slow-on circuit). Also, this circuit is excellent for the 3A5 of version 2 of the amplifier, which requires a DC filament supply. The slow-on supply will also increase the life of tubes! The MJ15004 should be heatsinked to dissipate about 12W.
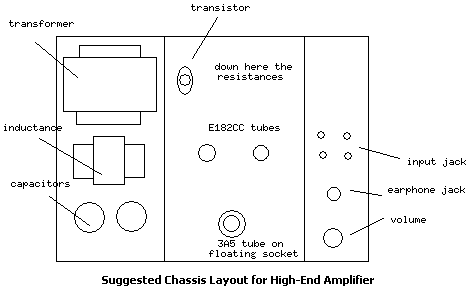
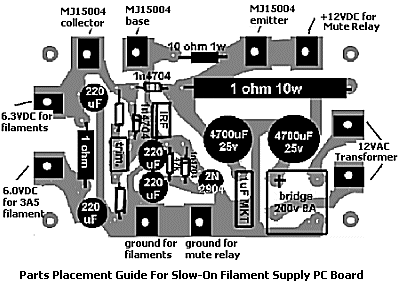
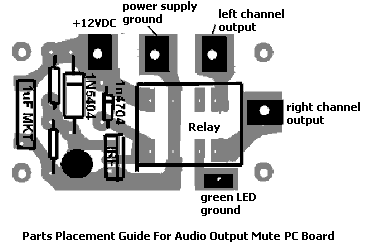
Full-sized PC board layouts are available for the slow-on power supply and the audio output mute circuits as well as the copper boards for mounting the Allen Bradley resistors. See below for the pc board stuffing guides and suggested chassis layout.
PERFORMANCE
Some achievements of my amplifier (regular version):
0.40% with Vout = 5.9v on 300 ohm => 80 mW "MAX POWER FOR Sennheiser 580"
0.17% with Vout = 2.9v on 300 ohm => 15 mw
0.07% with Vout = 1.2v on 300 ohm => 2.5mw
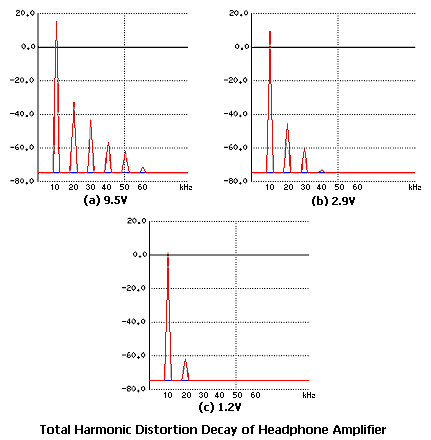
Figure 9
The graphs in figure 9 are the THD (distortion) decays for the standard amplifier at 9.5V, 2.9V and 1.2V: PERFECT! They show a linear harmonic decay (and the lower the power, the lower the distortion).
[Editor: For the latest version of Andrea Ciuffoli's design, see A No-Compromise OTL Tube Headphone Amplifier.]
Addendum
9/17/98: Updated figure 4 regulated supply: replaced single MOSFET with MOSFET/BJT Darlington pair to better handle surge currents from large output capacitors. Updated figures 4 and 5 power supplies: grounded filament supply and removed connection point "E" from amplifier schematic (figure 3). Also added a "cheap" version of the passive supply (figure 6).
9/22/98: Added version 2 of amplifier schematic (figure 3b) and revised power supply schematics (figures 4, 5, 6 and 7).
9/24/98: Added Rin to both amplifier schematics (figures 3a and 3b) and removed 6VDC output from slow-start power supply schematic (figure 7). Also corrected value of R7 and fixed spelling of DCC90 name for V1 tube in version 2 of amplifier.
9/29/98: Updated version 2 amp schematic (figure 3b) - added R8, R9. Updated slow-start filament supply (figure 8). Added layout diagram for mounting 7x22K resistors (figure 3c) and suggested chassis layout diagram (figure 7). Also added paragraph on capacitor selection.
9/30/98: Added PC board layouts and chassis layout.
10/15/98: Added 6SN7 version of the headphone amplifier. Also added notes re heatsinking BUX48 and MJ15004.
c. 1998, Andrea
Ciuffoli.
For commercial use of the circuits in this article, please contact Andrea Ciuffoli.
From Andrea Ciuffoli's Home Page.
Republished with permission.